Basic Items
In this tutorial we will make a simple item with a name and a texture. We will also make a new creative tab to put items in.
Concepts
Each type of item in Minecraft is represented by an instance of the Item class. This means that variables on your item class are shared by that type of item in general, not specific to each individual item in your inventory. Each stack of items can store unique data (like its durability) on the ItemStack (more later).
Many things in Minecraft (like items, blocks, biomes, etc) must be registered to let the game know that they exist. There are two ways to do this. You could use an object holder that starts out as a null reference and manually register it on the correct registry event (we'll talk about events later). Alternatively, you can use a deferred register to tell the game to automatically create the item at the right time. A deferred register acts as a layer of abstraction over the basic registry system. You just set it up, tell it about your items (or blocks or whatever), and Forge will automatically register them for you at the right time. If you're interested in the details, read the registry system tutorial.
New Item
Make a new package (in src/main/java/com/name/modname, same place as your main class) called init and in that make a new class class called ItemInit. This is where we will register all our items. I recommend doing this with deferred registers. First, we have to get the item register so we can tell the game about our items.
public static final DeferredRegister<Item> ITEMS =
            DeferredRegister.create(ForgeRegistries.ITEMS, FirstModMain.MOD_ID);
Make sure you import all the classes you need. In intellij unimported classes will be written in red and you can press option enter on them to import them. Very important to import the version of Item from net.minecraft.world.item.
Then you can register your first item. It's going to be both static and final, the convention is to name it in all uppercase. Call the register function and the first argument is the name which must be all lowercase (this can be used to give it to yourself in game with /give Dev modid:item_name) and the second is a supplier for a new Item which takes in a new Item.Properties. Later, if you want to access the item from your code you can do ItemInit.ITEM_NAME.get()
public static final RegistryObject<Item> SMILE = ITEMS.register("smile",
            () -> new Item(new Item.Properties()));
The Item.Properties parameter sets certain data about like item such as durability, stacksTo (max stack size), fireResistant (survives lava like netherite equipment), if it works as a food. We will do more with this in later.
Creative Tab
If you want to make a new tab in the creative menu for your item to show up in, you can make an inner class that extends CreativeModeTab. Let your IDE autofill the default constructor and then override the method called makeIcon which returns an ItemStack to use as the icon in the GUI. You can reference you're own item here (with a .get() on the end) or a vanilla item (ex. Items.DIAMOND_SWORD, with no .get()).
public static class ModCreativeTab extends CreativeModeTab {
    private ModCreativeTab(int index, String label) {
        super(index, label);
    }

    @Override
    public ItemStack makeIcon() {
        return new ItemStack(SMILE.get());
    }
}
Then (still in the inner class), you can make a static instance of this class to actually use. The index is just its place in the list of item groups (so the current length of the list) and the name can be used in the lang file to set the text displayed when the logo is hovered over (all lowercase).
public static final ModCreativeTab instance = new ModCreativeTab(CreativeModeTab.TABS.length, "firstmod");
Then you can update the Item.Properties used when you create your item to reference your group. If you want it to show up in a Vanilla creative tab, just use something like CreativeModeTab.TAB_FOOD (your IDE should let you auto fill the others)
new Item.Properties().tab(ModCreativeTab.instance)
NOTE: this replaces only the Item.Properties passed into the item constructor above. All you're changing is calling that extra
tabmethod.
Main Class
In the constructor of your main class call the register method of your DeferredRegister. This tells the game about any items you make. So that constructor should look something like this.
public FirstMod() {
    final IEventBus modEventBus = FMLJavaModLoadingContext.get().getModEventBus();

    modEventBus.addListener(this::setup);
    ItemInit.ITEMS.register(modEventBus);

    MinecraftForge.EVENT_BUS.register(this);
}
Assets
In your project folder go to src/main/resources and make a new folder called assets, in that make one called your modid and in that ones called lang, models, and textures. In the textures folder make a folder called items and in that put a png image to use for your item in game. In the models folder make a folder called item.
In the lang folder make a new file called en_us.json This is where we tell it how to display the names for our item and item group in game. Make sure to change firstmod to your modid and smile to your item name.
{
    "itemGroup.firstmod": "First Mod Items",

    "item.firstmod.smile": "Smiley Face"
}
Then in models/item make a file called item_name.json (replace item_name with whatever string you passed into the Item constructer). In the layer0 item, make sure to change firstmod to your modid and smile to the name of the image file you want to use (do not include the .png extension).
{
    "parent": "item/generated",
    "textures": {
        "layer0": "firstmod:items/smile"
    }
}
Your file structure should look like this:
src/main
    - resources/assets/modid/
        - lang/
            - en_us.json
        - models/
            - item
                - item_name.json
        - textures/
            - items/
                - item_name.png
    - java/com/name/modname/
        - ModNameMain.java
        - init/
            - ItemInit.java
Data Generators
If your mod has a lot of items that just use their own basic texture, it can be tedious (and error prone) to repeatedly copy the model json file, just changing a single line each time. Luckily, Minecraft provides a way to generate these files from code. This will be covered in detail in a future tutorial. Join the discord server to be notified when it is released.
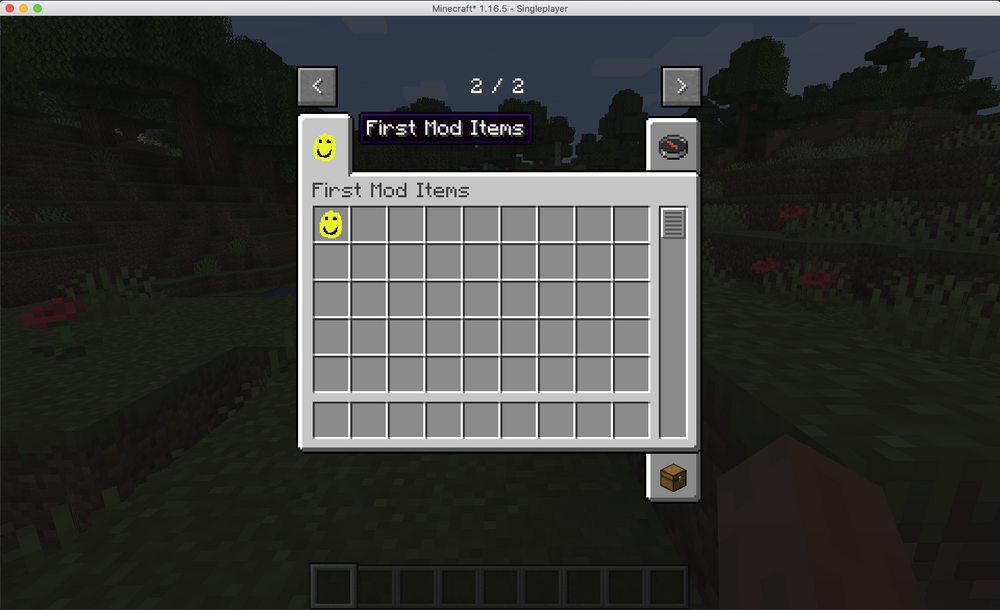
Run the game
Now run the game. It will take a few minutes to load but eventually you should be able to see that your item shows up in your creative tab.