Advanced Blocks
A tutorial on making a block with custom behaviour. It will react to being right clicked, explosions, random ticks and even act as soil for crops!
Init
Very similar to how we did advanced items, let's make a block that has some unique behaviour by creating our own version of the block class. Start with the same code for a basic block but reference a new class.
public static final RegistryObject<Block> SAD_BLOCK = BLOCKS.register("sad_block",
            () -> new SadBlock(Block.Properties.copy(Blocks.DIRT)));
Note that I'm copying the Block.Properties from the vanilla dirt block. If you were using one of your own blocks you'd have to call .get() to access the actual block itself because deferred registers are like that.
Block Class
Now create the class for your block. It will extend block and use the default constructor.
public class SadBlock extends Block {
    public SadBlock(Block.Properties properties) {
        super(properties);
    }
}
Just like with the Item class, Block has many fun methods to override to get interesting behaviour.
Right Click Behaviour
The use method defines what happens when a player right clicks the block. Note that is is called twice. Once for the off-hand and once for the main hand. You can check which hand it's for by comparing the hand argument that's passed in to InteractionHand.MAIN_HAND and InteractionHand.*OFF_HAND*.
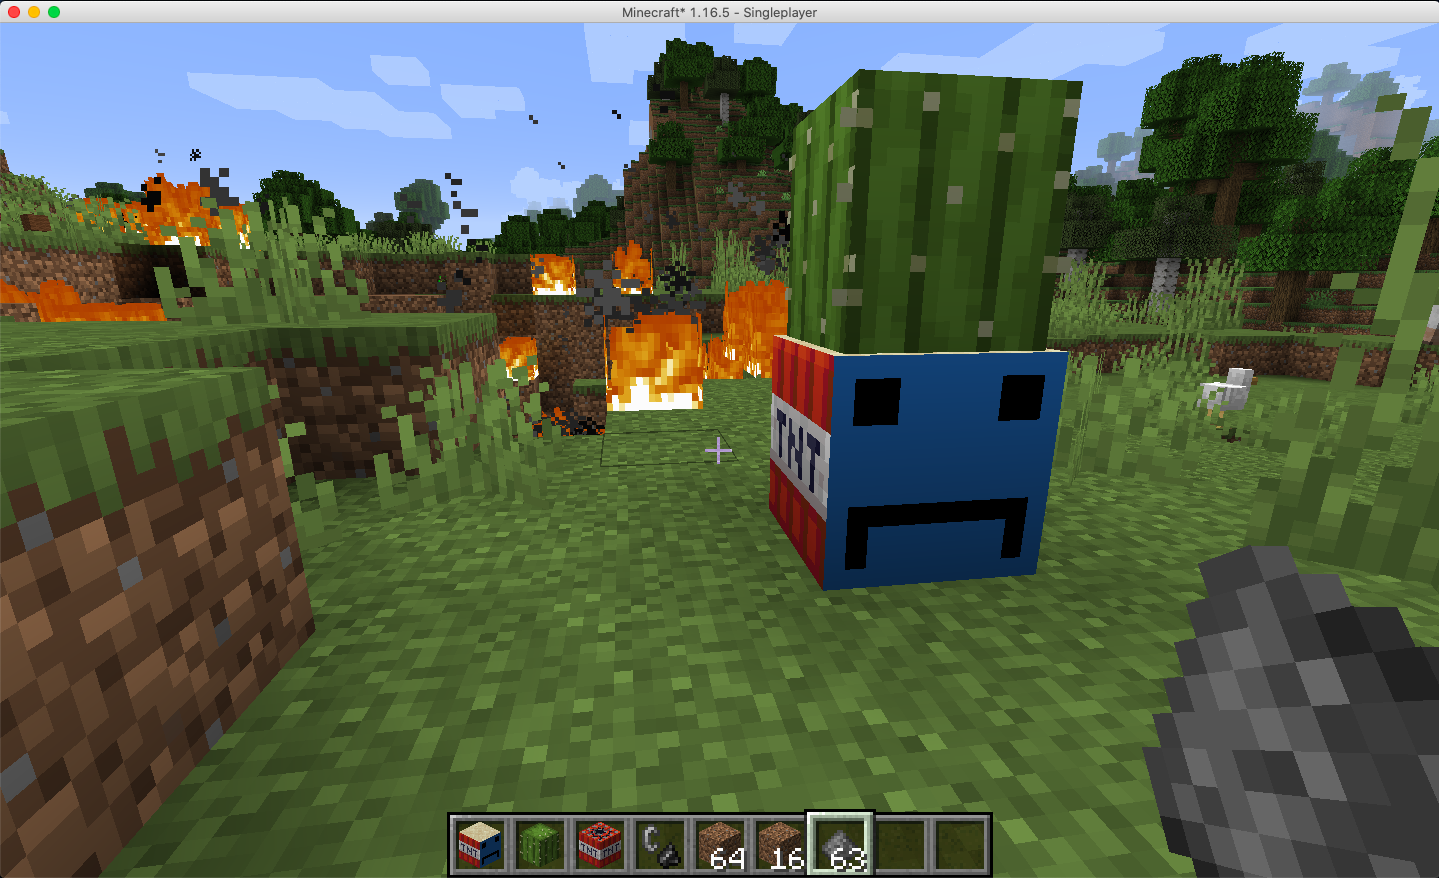
You can do anything you want here but I want my block to be explosive so I'll start by getting the ItemStack in the player's hand and checking if it is gun powder. The world's explode method requires the entity responsible for the explosion (for death messages, etc. Can be null), the position, the size to make the explosion (tnt is 4), a boolean of whether it should set fires, and the explosion mode (NONE does not damage terrain, BREAK drops items from the blocks it breaks while DESTROY deletes them). I'll also shrink the item stack by one so it consumes the gun powder.
@Override
public InteractionResult use(BlockState state, Level world, BlockPos pos, Player player, InteractionHand hand, BlockHitResult hit) {
    ItemStack held = player.getItemInHand(hand);

    if (!world.isClientSide() && held.getItem() == Items.GUNPOWDER){
        world.explode(player, pos.getX(), pos.getY(), pos.getZ(), 4.0F, true, Explosion.Mode.DESTROY);
        held.shrink(1);
    return InteractionResult.CONSUME;
    }

    return super.use(state, world, pos, player, hand, hit);
}
Note that explosions won't work if the block's blast resistance is too high (because the explosion starts from inside the block)
Server vs Client
You might also notice that I have an extra condition before doing anything: !world.isClient(). This checks that we are running on the server side. Minecraft's code is split into two sections. These are easiest to think about when you imagine playing on a server with other people. There is one computer somewhere that thinks about all the logic for the game (the server) and tells the other players what their computer should render (the clients). Some things happen only on the server (like saving world data), some things happen only on the client (like rendering entities), but most things happen on both (like this Block.use method). Learn more: here.
This means that you have to manually check which side you're on if you plan to do anything that might behave differently across the sides. Most behaviour you want to run only on the server side and let Minecraft automatically sync to the client. It can get very weird if you accidentally only do something on the client. Important to note that fields set on your objects can have different values on the client and the server. This can lead to some very confusing behaviour if you're not careful. Later when you do more complicated things and need you sync data between the client and the server, you will have to use packets.
Interaction Results
There are four different InteractionResults you can return from this method (also used in several others involving players interacting with things).
SUCCESS: Use this when your item/block/entity has met all the requirements for the interaction, and you have completed everything that needs to be done. This will prevent any further action from being taken with the interaction.CONSUME: You can use this when you meet the same conditions as SUCCESS, but additionally are consuming an item/block as part of the interaction. This InteractionResult isn't explicitly checked as of 1.15.2, and so using this is mostly optional.PASS: Use this when you do not meet any of the requirements for the interaction (not holding the right item, etc.). This signals for the game to attempt to interact with the other hand, and also try to use the item's interaction methods and other similar methods.FAIL: Use this when you have met the minimum requirements for the interaction (holding the right block, etc.), but fail to meet further criteria. This should be used when you want to indicate that the player intended to interact with your object, but failed to meet further criteria. This will prevent any further action from being taken with the interaction.
Being Exploded
You can use the wasExploded method to react to the block being broken by an explosion. I'll just create an explosion just like before so they can be used in chain reactions like TNT.
@Override
public void wasExploded(Level world, BlockPos pos, Explosion explosion) {
        world.explode(null, pos.getX(), pos.getY(), pos.getZ(), 4.0F, true, Explosion.BlockInteraction.DESTROY);
    super.wasExploded(world, pos, explosion);
}
Allowing Plants
You can override canSustainPlant to allow your block to act as soil for specific plants, simply return true if the plant passed in should be allowed to grow. I'll get the Block from the Iplantable passed in and allow it to grow if it's a cactus. Otherwise, I'll use the super method to let the vanilla behaviour decide. Which in this case will always be false, preventing any other plants from growing.
@Override
public boolean canSustainPlant(BlockState state, BlockGetter world, BlockPos pos, Direction facing, IPlantable plantable) {
        Block plant = plantable.getPlant(world, pos.relative(facing)).getBlock();

    if (plant == Blocks.CACTUS){
            return true;
    } else {
        return super.canSustainPlant(state, world, pos, facing, plantable);
    }
}
Random Ticks
Sometimes a block needs to do something occasionally (for example crops need to grow, grass needs to spread). Over time each block in the world randomly have its tick method called. The median time between random ticks is 47 seconds and it's affected by the random tick speed game rule. Learn more on the wiki.
To allow your block to receive random ticks, you must either call randomTicks() on the Block.Properties used to create your block or override isRandomlyTicking in your block class to return true.
Then you can override randomTick to do something interesting. I'll make mine check if the block above is air and create a cactus.
@Override
public boolean isRandomlyTicking(BlockState state) {
    return true;
}

@Override
public void randomTick(BlockState state, ServerLevel world, BlockPos pos, Random rand) {
    BlockState above = world.getBlockState(pos.above());
    if (above.isAir()){
        world.setBlockAndUpdate(pos.above(), Blocks.CACTUS.defaultBlockState());
    }
}
You can use the command /gamerule randomTickSpeed 9999 to increase the tick rate while testing.
Other Methods
The Block class has lots more methods to play with. Here's a description of a few of them:
playerDestroy(used by beehives to release angry bees when you break them)onRemove: called when the block is destroyed for any reasonhandleRain: 1/16 chance to be called each tick while its raining (used by cauldrons to fill with water)fallOn: called when an entity falls on the block. Deals the fall damage by callingEntity.causeFallDamage(distance, damageMultiplier). (used by farm land to break the crop)onPlacegetExpDropreturns the number of experience points to give when broken (like some vanilla ores)
Rotation
To make the block rotatable like a furnace, you have to add a property to the block state so you can tell the model file which sides to render where. It will hold a value of NORTH, SOUTH, EAST, or WEST which represents the direction it is facing. First create the property as a static field in your block class.
public static final DirectionProperty FACING = HorizontalDirectionalBlock.FACING;
Then set a default value of the state in the constructor. We will replace this with the correct direction when a player places the block but it would probably randomly crash sometimes if you don't do this.
this.registerDefaultState(this.stateDefinition.any().setValue(FACING, Direction.NORTH));
You also need to tell the block about the properties it is allowed to use by adding this method:
@Override
protected void createBlockStateDefinition(StateDefinition.Builder<Block, BlockState> builder) {
        builder.add(FACING);
}
You'll have to override getStateForPlacement to have it face the player when placed. This snippet is taken from the vanilla furnace. If you want to to face forwards from the player instead of towards them, take out the .getOpposite().
@Override
public BlockState getStateForPlacement(BlockPlaceContext context) {
    return this.defaultBlockState().setValue(FACING, context.getHorizontalDirection().getOpposite());
}
Now you'll need to create a block state json file. This must have the same name as your block's registry name. /src/main/resources/assets/modid/blockstates/block_name.json:
{
    "variants": {
    "facing=east": {
        "model": "firstmod:block/sad_block",
        "y": 90
    },
    "facing=north": {
        "model": "firstmod:block/sad_block"
    },
    "facing=south": {
        "model": "firstmod:block/sad_block",
        "y": 180
    },
    "facing=west": {
        "model": "firstmod:block/sad_block",
        "y": 270
    }
    }
}
You can also do more complicated things in your block state like switching out the model file and using multiple block state properties. For example the furnace uses facing=west,lit=false and facing=west,lit=true to switch to a version of the model where the face is lit up when something is cooking (lit being a BooleanProperty instead of a DirectionProperty).
The y number tells it how much to rotate the model around the up-down axis. Things like dispensers that need to rotate around another axis use x as well (to do that you'd have to make some changes above: use DirectionalBlock.*FACING*instead ofHorizontalBlock.FACING and getNearestLookingDirection() instead of getHorizontalDirection in your getStateForPlacement method).
Then you'll need to make the model file (in assets/models/block/ as before). You can directly set the north, south, east, west, up and down textures (as they should be when your block is facing north, meaning 0 y rotation from the block state) but there are several templates you can use as parents to save some typing. You can look at the vanilla assets to see some other options. I'm using orientable which lets you set the sides and bottom all the same quickly. Note that you can also reference vanilla textures here.
It can be named anything because a single block state definition might need multiple models. Its name is the string you referenced in the block state file (so sad_block.json for me).
{
    "parent": "minecraft:block/orientable",
    "textures": {
    "top": "minecraft:block/sand",
    "front": "firstmod:blocks/sad_block",
    "side": "minecraft:block/tnt_side"
    }
}
If you you're making a block without rotation, you can just make a generic block state and model file similar to the basic block. Don't forget to update your lang file and make item model file for the block just like we did for the basic one. You should also make a loot table so your block drops something interesting.
Run the Game
You should now have a fully functional block with custom functionality!
Related Tutorials
- Tile Entities: Allows your block to save data and react to every tick. I made mine kill nearby mobs!
- You can also make your block a point of interest for a custom villager profession. Tutorial for this coming soon! Join the discord server to be notified when they are released.
Practice
- Make a soil that grows crops very quickly while it's raining
- hint: look at how the vanilla
BoneMealItemusesBonemealableBlock
- hint: look at how the vanilla
- Make a directional block that rotates when you right click it