Environment Setup
How to setup a forge development environment for 1.16.5 with the official mappings. We download java 8, forge and IntelliJ. We also rename our main package and class and update the mods.toml file.
Downloading
First, download the JDK (java 8 development kit). Go to oracle.com and select your operating system. It will ask you to make an account but you can borrow someone else's credentials from bugmenot.com. Just copy paste them in and if the first doesn't work, try the next one.
Next you need the Forge 1.16.5 MDK (mod development kit) from files.minecraftforge.net. Get the recommended version cause its the most likely to work.
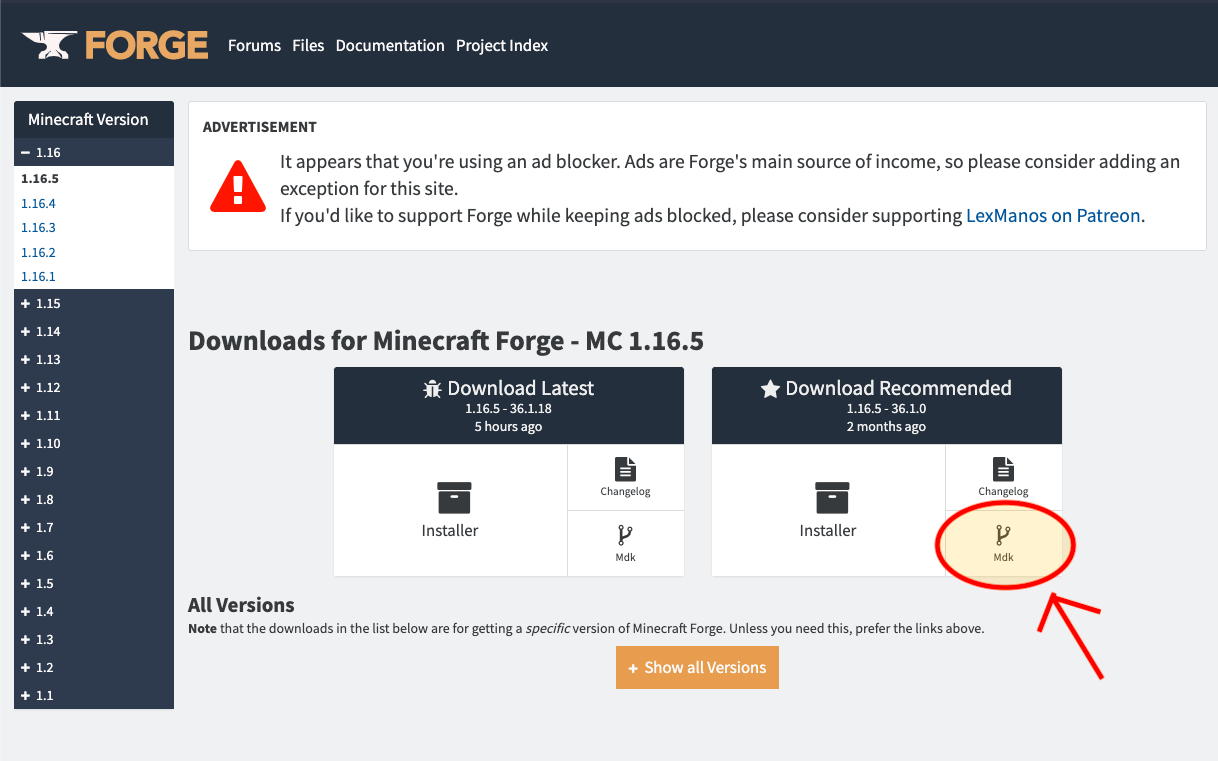 When you click the button to download the MDK it will send you to a page with ads. Very important not to click any of them (even if they look like pop ups from your OS), just wait a few seconds until the skip button appears in the top right and click that to download.
Then you need an IDE to write your code. Download intellij from jetbrains.com and get the community addition because it's free.
Installing
Double click the JDK download to open it. Just go though the installer and agree to everything. It will probably need an administrator password and take a long time to install.
Then unzip the forge MDK and rename the folder to the name of your mod. You can remove the license, readme and credits files.
Finally, launch intellijj. The first screen should let you choose some settings. You probably want dark theme but for everything else the defaults are fine. Then you want to click 'open a project'. Select the forge folder you just renamed and give it a while to do the indexing (there should be a little loading bar at the bottom of the screen).
Setup
In the project explorer on the left open src/main/java and right click com.example.examplemod Choose refactor > rename to change your package name to something unique so you don't conflict with other mods. The convention is to named it based on a domain you own, reversed like tld.website.modid, so I did ca.lukegrahamlandry.firstmod. Make sure there's no spaces or capital letters. Open ExampleMod.java and right click the name of the class to rename it to ModNameMain. This is your mod's main class. Some of these functions can be removed but it's fine if you leave them.
Make a variable that holds your mod id. This is how the forge mod loader will recognize your mod. It's generally based on your mod's name, unique and all lowercase with no special characters. You will use this often, don't forget it. It is also very important to change the value in the @Mod annotation at the top of the class to reference your mod id. I took out some of the unnecessary methods from this base class just to clean it up a bit. Here's what it looks like now:
// imports up here //

@Mod(FirstModMain.MOD_ID)
public class FirstModMain {
    public static final Logger LOGGER = LogManager.getLogger();
    public static final String MOD_ID = "firstmod";

    public FirstModMain() {
        final IEventBus modEventBus = FMLJavaModLoadingContext.get().getModEventBus();

        modEventBus.addListener(this::setup);
    }

    private void setup(final FMLCommonSetupEvent event) {

    }
}
Open src/main/resources/META-INF/mods.toml It has a bunch of key value pairs that mostly set the information shown on the mods list in game. The only one you have to change is the modId (to whatever you had in your main class). You must keep the modLoader and loaderVersion the same but the fields lower down like display name can be whatever you want, they'll be displayed in the mods list ingame. You should also choose a license, go to https://choosealicense.com for more information.
modLoader="javafml"
loaderVersion="[36,)"

license="ARR"

[[mods]]

modId="firstmod"


# ... more fields down here
The build.gradle file tells it what dependancies to download (like Minecraft and Forge). Set the group to whatever you named your package (and click the elephant icon in intellij to update these settings).
group = "ca.lukegrahamlandry.firstmod"
Close intellij, open the terminal, navigate to your mod folder and run the command below (on windows use CMD and you don't need the ./ prefix). It will take a while to run.
cd /path/to/mod/folder
./gradlew genIntellijRuns
Run the game
You can open intellij again and run the game by clicking the little green play button in the top right. If you have any problems with that you can also run it with the command below.
./gradlew runClient
Info Files
In the top level of your mod folder you'll find a few extra files about forge. I suggest taking out changelog.txt and credits.txt. You should replace license.txt with a license that has information about how people are allowed to use your code (learn more about license options at choosealicense.com). Finally replace readme.txt with README.md so you can use markdown and GitHub will render it properly. This file should contain information about your mod's features, supported versions and perhaps a link to your CurseForge page once you're ready to release your mod.
Alternative Setup
- If you are using an Apple Silicon (m1) computer, read the Apple Silicon tutorial
If you are just starting to learn modding and followed the instructions above, this section does not apply to you. Skip ahead to the next tutorial :)
If you already have a 1.16 mod that you would like to follow these tutorials with, you should make sure you're using the same Minecraft and mappings version. Open your build.gradle.
In the dependencies block I have minecraft "net.minecraftforge:forge:1.16.5-36.1.0". The important part is that you're on 1.16.5, the forge version matters less.
In the minecraft block I have mappings channel: "official", version: "1.16.5". Your mappings are what determine the names of the methods from vanilla Minecraft that you have to interact with. If you change your mappings you should be able to automatically update your existing code. Run the ./gradlew -PUPDATE_MAPPINGS="1.16.5" -PUPDATE_MAPPINGS_CHANNEL="official" updateMappings command in your main mod folder (same as above, windows uses CMD instead of terminal and does not have the ./ prefix).
Now you should be ready to follow along with the rest of my tutorials!